
This is an experiment to test the state of augmented reality on the Apple iOS platform, by placing 3D models of historic structures in their original locations. I wanted to see how accurate the placement could be and how realistic they would appear. This post is intended to provide a little guidance to anyone starting out on an augmented reality project placing large objects using real world coordinates.
The Workflow
Figuring out the workflow was difficult as there are not a lot of resources out there and professional teams use expensive graphics tools. You have to understand the different 3D formats and know what features are supported by each. You can create beautiful textures and animations but transferring them to iOS can result in lost features. I settled on using Blender for 3D modelling because it is widely used and open source. I export to GLTF as it includes the photos used for materials. I then use the Apple’s usdconvert tool, to convert from GLTF file to USDZ.
Animations carry over just fine, but GLTF does not support particle systems. I have since learned about Houdini which has free and low-cost options. Eventually I will give it a try. I may try adding Houdini to my workflow after Blender to add particle-based effects to create smoke and fire.
Placing Objects
Depending on your tolerances you may or may not be able to use the device’s GPS to place objects. If positioning needs to be within 10 meters, it’s not going to happen, and you will need to take a look at other approaches.
I chose to have the user go to a pictured location and instruct them to tap on the picture when they are in the same place the photo was taken. Another option for positioning is to use machine learning image matching to position the user without the need for manual selection. You could match several images to triangulate the user’s position. Hopefully better GPS technology will be included in devices of the future.
This works pretty well with scene alignment being fairly consistent.
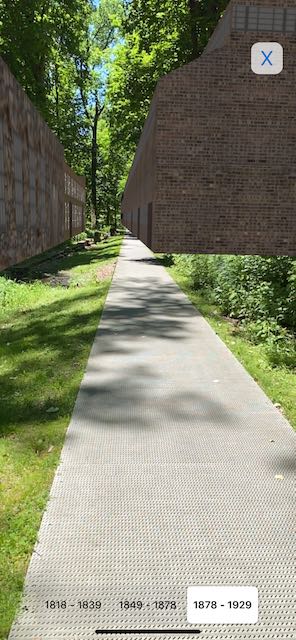
Alignment can sometimes be a little off
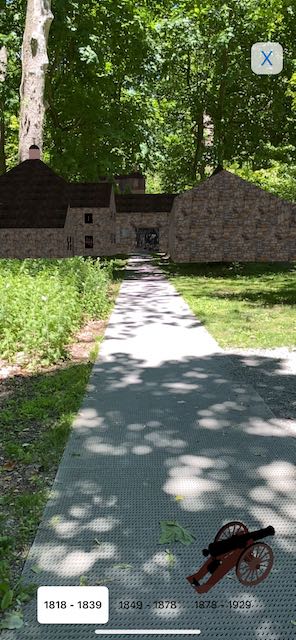
Alignment spot on
Instructing the user to reload the scene in this case is one option. More work could be done to ensure a high confidence heading is received before loading the scene.
To place an object, you must know the latitude and longitude of the user and where the object will be placed. I used Google Earth to obtain the center position of my scene. In blender I set the origin to be the corner of a structure that was easily identifiable using Google Earth. I used the compass on my iPhone to find the rotation of the scene. I could probably improve the alignment using a dedicated GPS to identify the coordinates.
Placing the object is pretty simple. Determining the rotation is a little trickier. In coachingOverlayViewDidDeactivate I set an anchor for the scene and then in renderer I add the scene as a node.
var zdistance = lastLocation.distance(from: destinationLocation)
bearing = lastLocation.coordinate.bearing(to: destination)
var matrix = matrix_identity_float4x4
matrix.columns.3.y = -2
matrix.columns.3.z = Float(-zdistance)
let radians = GLKMathDegreesToRadians(degrees)
let rotate = GLKMatrix4MakeYRotation(radians)
let float4 = float4x4(SIMD4<Float>(matrix.m00, matrix.m01, matrix.m02, matrix.m03),
SIMD4<Float>(matrix.m10, matrix.m11, matrix.m12, matrix.m13),
SIMD4<Float>(matrix.m20, matrix.m21, matrix.m22, matrix.m23),
SIMD4<Float>(matrix.m30, matrix.m31, matrix.m32, matrix.m33))
let transform = simd_mul(float4, matrix)
sceneAnchor?.bearing = bearing
sceneView.session.add(anchor: sceneAnchor!)
And then in renderer:
let adjustedRadians = (siteScene.degrees!) – bearing
let r = GLKMathDegreesToRadians(Float(adjustedRadians))
siteScene.node.childNodes.first!.rotation = SCNVector4(0, 1, 0, r)
Quick Look
Large building size objects will be too large to display using Quick Look. Scale the object down to a tabletop size before presenting. I found a scale of 0.025 to work well. Quick Look does not currently support double sided faces. On several models where I wanted to show the inside using a cutaway, I solidified the planes in Blender and then extruded them to create 3 dimensional surfaces. This was only necessary for Quick Look as the back sides were textured in the scene view.
Some Suggestions
To be worthy of someone’s time it is important to include fun features. Some ideas to aid with this are embedding historical photos, use of sound effects, narration, video, taking selfies, and including trivia. Your app should be more than just a building in a field.
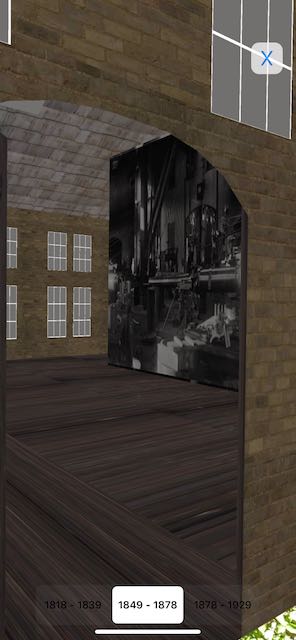
Use of a photo inside a building
If your project is part of a tour you can add labels in your virtual environment that correspond to the tour stops. This can help users understand what objects they are looking at. The labels can look like bubbles, realistic signs, or transparent labels like in a sci-fi film. Here I chose to add rustic signs to the structures and at ground level.
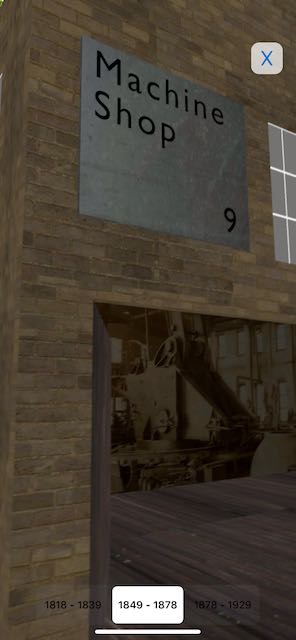
Label objects to correspond to existing tour stops
You could even add interactions where tapping on a label, or object opens a dialog with more information.
Sometimes you will want to occlude part of your model depending on the perspective. I used virtual trees to help blend the bottom of some pillars into the landscape.
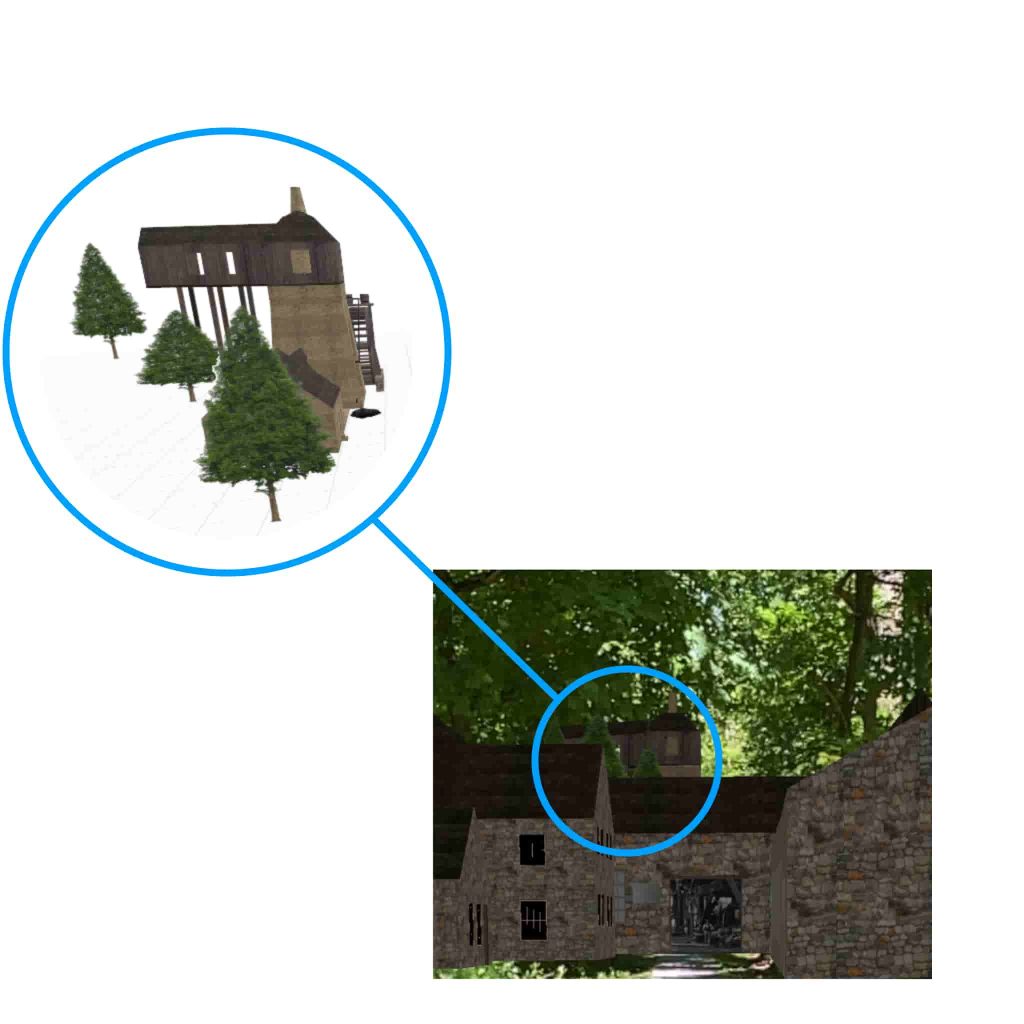
Use elements like trees to help your model blend in with the environment.
Your model textures will appear dull without lighting. The lights created in Blender did not transfer for me. There are several options to add lighting after copying the models to XCode. Lighting can be added by opening the model in XCode, or in code. I found the default lighting to be adequate, however adding lights inside the models could help illuminate photos and make the scene easier to see.
sceneView.autoenablesDefaultLighting = true
sceneView.automaticallyUpdatesLighting = true
sceneView.rendersMotionBlur = true
sceneView.rendersCameraGrain = true
Placing objects on planes can cause them to move as ARKit detects additional area.
Conclusion
I found this to be a rewarding project because it brought together several interests I have wanted to try out for a long time. A project like this can combine 3D modelling, photography, audio and video. The fact that these types of projects is now possible is truly impressive and my hats off to Apple.